Using Skeddly as a Chaos Monkey
Chaos Monkey is a tool built by Netflix that randomly terminates instances within your infrastructure. The reason for doing this is to help ensure that your applications continue to run in times of instance failures.
By introducing “automated failure” into your infrastructure, you are forcing your DevOps, IT, and developers to plan for failure. This is one of the key mantras of cloud computing. By forcing an instance failure at known and/or friendly times, your team can react if your application does not behave positively.
Recently, we announced a new action called “Terminate EC2 Instances”. Using this new action, you can easily implement your own version of Chaos Monkey. Today, we’ll walk you through this process.
Step 0: Sign-up for a Skeddly account
If you haven’t already done so, sign-up for a Skeddly account. It’s free to try this out with our 30-day free trial.
Step 1: Register AWS Credentials
First, we’ll need some AWS credentials to use for our Chaos Monkey.
- Sign-in to your Skeddly account.
- Click the “Credentials” tab to go to the Credentials section.
- Click “Register Credentials” and follow the guide to register your AWS credentials with Skeddly.
Step 2: Create a “Terminate EC2 Instances” action
Once you have your AWS credentials registers, you can create your Chaos Monkey action.
- Click the “Actions” tab to go to the Actions section.
- Click “Create New Action”.
- Find “Terminate EC2 Instances” in the list of action types, and click it.
- Name your new action. I called mine “Chaos Monkey”.
- Choose to run your action with a Daily schedule, Monday through Friday only, at 11:00 am. This way, your action will only run the morning on days of business.
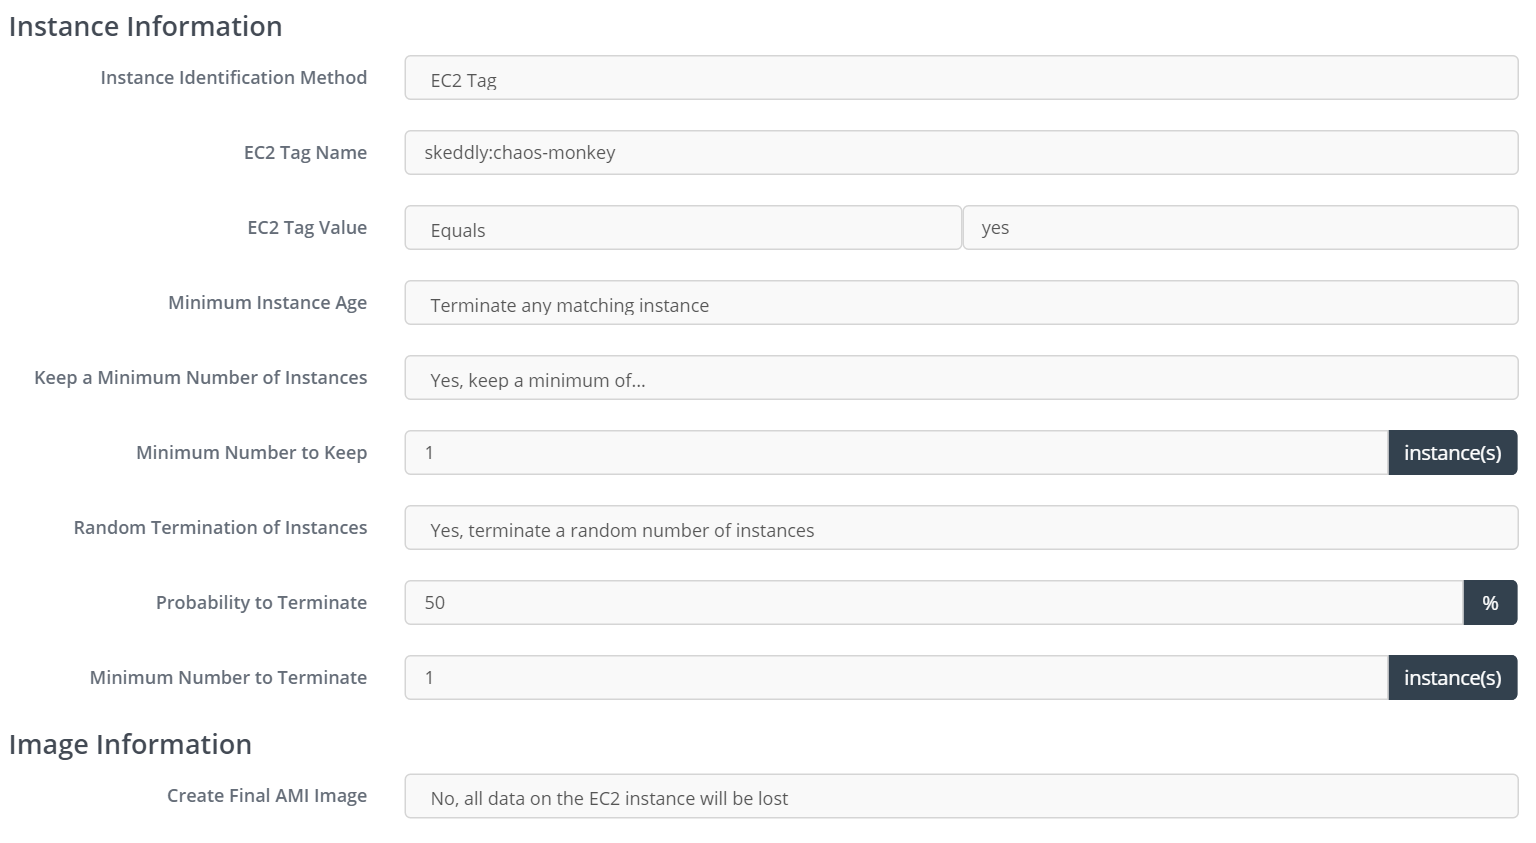
- Use the following field values:
- Instance Identification Method: By EC2 Tag
- EC2 Tag Name: skeddly:chaos-monkey
- EC2 Tag Value: equals yes
- Keep a Minimum Number of Instances: Yes
- Minimum Number of Instances: 1
- Random Termination of Instances: Yes
- Probability to Terminate: 50%
- Minimum Number to Terminate: 1
- Create Final AMI Image: No
With these values, we’ll scan the AWS account for EC2 instances with an EC2 tag named “skeddly:chaos-monkey” that has a value of “yes”. From those EC2 instances found, we’ll ensure that 1 is kept from termination. Of the remaining instances, at least one will be terminated with a 50% probability that each of the other EC2 instances will be terminated.
You can play with the probability percentage to have more or less instances terminated. You can choose to set this value to 0% which will then only have the minimum (1 in this case) EC2 instances terminated during each execution.
Warning: we are not creating a final AMI image in this example. This assumes that your EC2 instances do not contain any non-recoverable data. If you would like to create a final AMI image, select “Yes” in the “Create Final AMI Image” field.
Here are my settings:
Step 3: Update your AWS credentials with an IAM policy
We need our AWS credentials to allow Skeddly to work in our AWS account. We do this by giving our AWS credentials an IAM policy with the required commands.
- Return to the Credentials action by clicking the “Credentials” tab.
- Click “Generate IAM Policy Document” in the right-sidebar to go to Skeddly’s IAM Policy Document Generator.
- Select your AWS credentials in the list of credentials and click “View IAM Policy Document”.
- Copy this policy to your clipboard.
- Go to the AWS Management Console and find your credentials.
- Add or edit the credentials “inline policy” and paste the policy document into the “Policy Document” field.
- Click “Apply Policy”.
Step 4: Add tags to your Auto Scaling group
Since we want to only terminate instances with certain tags, we need to add those tags to our Auto Scaling group.
- Return to the AWS Management Console.
- Go to the Auto Scaling section of the EC2 console.
- Select your Auto Scaling group.
- Click the “Tags” tab to activate the tab, then click the “Add/Edit tags” button.
- Add a tag named “skeddly:chaos-monkey” with a value of “yes” (without the quotes). Make sure to enable “Tag New Instances”.
- Save the changes.
The new tag will only be added to new EC2 instances. So you’ll need to manually terminate the existing ones in your group so that new instances with the tags are created.
Once the new instances are created, you can move on to step #5.
Step 5: Watch your instances terminate
At this point, you can wait for your scheduled execution time to see your EC2 instances terminate. You can also trigger the action to run manually for a more instant gratification.
Try It Today
Sign-up for our 30 day free trial or sign-in to your Skeddly account to get started today.
Additional References
More information about Chaos Monkey can be found at: