Easy Automatic EBS Snapshots
Skeddly is capable of creating EBS snapshots based on a set of EBS volumes, or a set of EC2 instances. For the latter, it will create EBS snapshots for all EBS volumes attached to your EC2 instances. Both methods allow you to configure Skeddly in such a way that it will look for EBS volumes or EC2 instances with certain tags and create snapshots for those volumes only.
In this article, I will show you how to setup easy daily EBS snapshots using Skeddly and EC2 tags.
If you haven’t done so already, create a Skeddly account and register your AWS credentials.
First, we’ll create a Daily EBS snapshot schedule.
-
Go to the Actions page by clicking the “Actions” tab.
-
Click “Create New Action” and select “Create Multiple EBS Snapshots”. You can also type “multiple ebs” in the Search box to find the action type faster.
-
Give your action a name like “Daily EBS Snapshots”.
-
Select your desired time of day, and select “Daily” for the Repeat Type. You can also select which days of the week you want to create snapshots for.
-
For “Volume Identification Method”, select “By EC2 Tag”. Type “Backup” for the “EC2 Tag Name” with “Equals” and “Daily” for the “EC2 Tag Value”.
-
We’re going to use some run-time macros to distinguish the snapshots. Type “$(VOLUMEID)-$(DATE)” for “Snapshot Name”.
-
Description can be whatever you want. Macros can also be used.
-
If it is safe to stop your EC2 instance briefly while the snapshots are started, then turn on “Stop Instance for Snapshot”. This will ensure the snapshots are consistent and not created while data is mid-write. If the server must remain running, then turn off this option, but be aware that the snapshots may not be consistent.
-
Save your action.
The action is ready to go, however, you should ensure your AWS credentials are permitted to execute everything needed by Skeddly.
-
Go to the Credentials page by clicking the “Credentials” tab.
-
Click the name of your credentials to go to the “View” page for the credentials.
-
Click the button labelled “Create IAM Policy Document”. This will generate an IAM policy document with just enough permissions to create your snapshots. Go to the AWS Management Console and update the policy on your credentials with this document.
Now Skeddly is all ready to start creating EBS snapshots. If everything is done correctly, you should never need to reconfigure Skeddly again.
Now, we’ll add some EBS volumes to our daily backup schedule.
-
Go to the EC2 portion of the AWS Management Console.
-
Select the “Volumes” section along the left side to view your list of EBS volumes.
-
Select an EBS volume you want to snapshot.
-
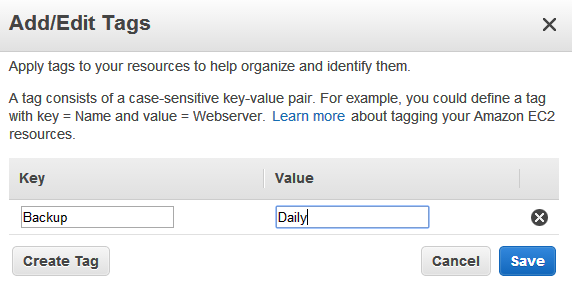
Select the “Tags” tab in the details area below the volume list and click the “Add/Edit Tags” button.
-
Add a new tag called “Backup” with a value of “Daily”. Save your new tag.
Now this volume will have a new EBS snapshot created daily. You can wait for the schedule time that your action is to run, or you can give it a try now.
To confirm now, return to Skeddly, find the action in the list of actions and click it’s name. The details of the action should appear along with a button labelled “Execute Now”. In a few minutes, you should have a nice shiny EBS snapshot.
To add more volumes to the backup schedule, simply add the “Backup” tag to each volume with the value “Daily”.
A very similar process can be used to create EBS snapshots based on EC2 instance instead. For that, create a “Backup Multiple EC2 Instances” action instead using the same principles. Then place tags on your EC2 instances instead of the EBS volumes.
It’s that simple.

